Featured Post

ReStore ReClaimed & RePurposed

Procurement of Style: Maybe you noticed the mysterious little blue tags on items that read “Procurement” while shopping at Ourtowns Re...

Friday, February 28, 2014

Bed Canopy + Wood Door + Creative Thinking = Super Awesome Sideboard Table

My mother called me the other day after attending a meeting with the art guild she is a member of with a cute puzzle to see if you have an "artistic mind." The equation is:

2+2= fish
3+3= eight
7+7= triangle

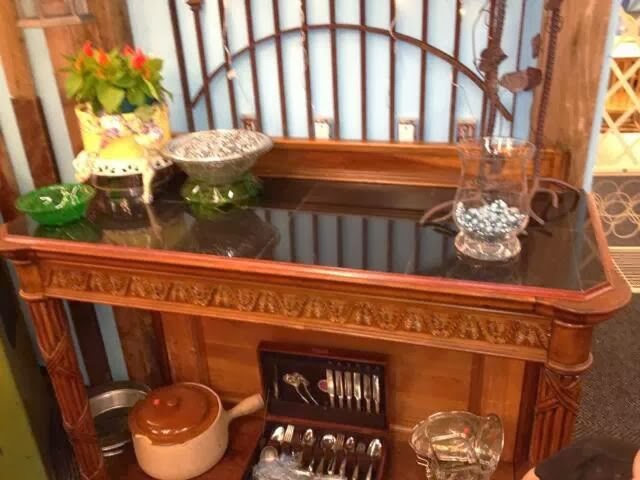
I got it. If the answer isn't as clear for you, I will share at the end of this next Restyle story.
The answer to the test above reminded me about the sideboard buffet table I had made for the 2013 Restore Restyle Event. This one did require the obsessive compulsive disorder or perfectionism that only my husband can add to any project. So where I may have been the brain power behind the concept and design behind the materials to be used, and after 3 days of thoroughly explaining to him exactly how a bed canopy, a wood door, 2 cabinet doors, 8 hardwood floor strips, and some granite tiles were going to come together, his craftsmanship is what made it come to life.

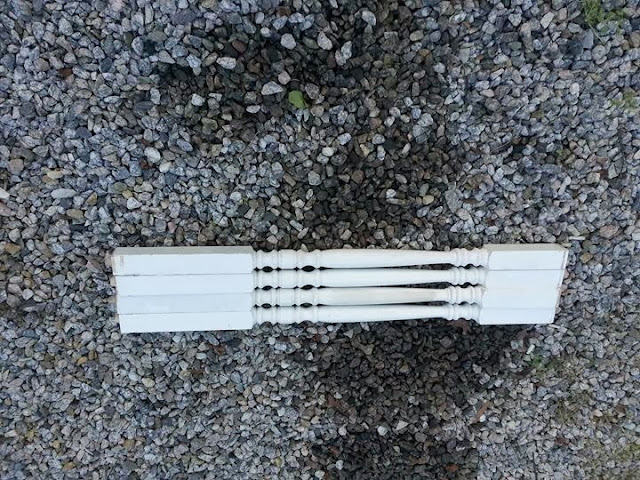
I wasn't exactly sure what they were until I got home later that day, all I knew was that I loved the detail of it and there was plenty of it to use in a project. It turned out to be the rails to turn a poster bed into a canopy bed.
My next challenge was to find a wood door that would match the rails and looked exactly like what I had pictured in my mind. (turns out it wasn't that big of a challenge, it was on the first aisle among the vast selection of varieties of doors and was $40)

I picked up the cabinet doors for $4 each. And the granite tile was $2 a piece.

First we figured out exactly where we would have to cut the door so that the hole of the door knob could be concealed. Then we laid out the rails and started work on rearranging them like a puzzle so that we could utilize their hardware and cut to keep the beautiful lines and pattern in tact.

After that, it pretty much came together in a snap. We built the frame and attached the cut door with screws to the back. We placed the cabinet doors on the top and the bottom. We used a bit of scrap plywood to build up the top to make it level with the frame. Then cut the granite tiles for the top. The bottom was finished with hardwood floor planks.


Once the grout dried for the granite. We glued a bit of trim from the hardware store ($3) that we stained, to add detail around the tile and make it flow into the wood around it. (By the way, Restore did have that trim in stock as well, but unfortunately it was Sunday, they were closed and I was on a deadline)


TAHDAH! A beautiful handcrafted sideboard buffet table that my husband REALLY hated to send away to be sold, he loved it so much.


I did tell him that he finished it too well and I don't think people could tell that we made it until they looked very closely. And in case you are wondering, That is an iron gate hung on the wall behind it I picked up at Restore for the challenge as well. It now has a wonderful home in my herb garden.

Now the answer to the puzzle:
2+2= fish 
Think about the Christian fish symbol you see on car bumpers, now think about flipping the 2's on their side and flipping one to mirror the other and bring them together... it makes a fish!
3+3=eight
Now that you get where this is going I don't think 8 needs much more explaining.

Friday, February 21, 2014

Picture Perfect Table

Picture Frame Table

During a visit the other day with a neighbor, I sat down at her kitchen table and realized that it had been the table that I had made for the Restore Restyle Designer Challenge that she had bought the night of the event. Seeing it again and talking about how it came to be, I thought I should share that process.

I had came across this giant framed picture at the Restore in Mooresville. Though I wasn't in love with the picture inside, I was in love with the frame and all of it's details and it's perfect square size. 
I started by taping off the inside of the frame and spray painting with my favorite color of primer, silver metallic. I highly recommend using this as a primer for everything. It seems to coat evenly, concealing everything and adheres well to finished surfaces virtually eliminating the need for sanding. I also find that it makes your top coat a more truer color that is brighter and with a more multi-tone effect as a result of how the light reflects off the metallics. After allowing the primer to dry, I then painted my top coat and allowed to dry. Then sealed the frame to the picture with clear silicone caulking. I covered the picture part and painted the outside of the frame.
Next step was cutting up the this cardboard of old Christmas gift boxes into my flower petals. I laid the petals out in a three circles, decreasing the size of the center with each ring. I sprayed each ring with spray adhesive,  ensuring that each petal was fully coated and then used colored tissue paper that I had wrinkled up and placed it on the cardboard. I used red, yellow and orange tissue paper, placing the red and orange on first and then sprayed more adhesive and placed the yellow at the inner part of the ring to give the flower more dimension. With the tissue paper in placed, I stacked the layers on top of each other and I used yellow and orange and coral/red spray paint to lightly mist the flower to blend all the colors together of the paint and tissue.


I used the metal grate of a commercial drop ceiling HVAC vent and cut it into 4 even squares and spray painted them green.


For the legs, I used 4 stair spindles nailed together I got from Restore ($2 each) for each leg and painted them black. I screwed the legs to the bottom of a small pallet I  then  nailed/glued the the picture down to it. For extra detail and to make the table appear more complete, I used 4 copper plumbing caps ($.50 each) and used a hole saw on the bottom of one of the 4 spindles for each leg and hammered the cap into the hole.


With the base of of the table now complete, I glued/screwed the picture to the top of the pallet. I sealed any holes that were made with the silicone caulk. I arranged the metal square in the corner and glued them down. Then I placed my flower into the center with glue and nailed a decorative paperclip with a upholstery brad in the center of the flower.
I decided to use an epoxy countertop mix to create a hard cleanable surface. Following the directions on the bow for the mix, I poured it inside of the frame and waited for it to dry.
I used base moulding from Restore to cover the visible part of the pallet under the frame and painted it.

The mystery challenge item that we had to incorporate into our room design was an electrical light switch plate. I painted 8 with copper leafing paint and attached them to each far corner onto the base moulding around the table. I then took metal necklace charms and snapped off the ring on top where the charm would hang from a chain and glued them to the center of each switch plate.


Once the epoxy had thoroughly dried, I placed a piece of plexiglass from Restore cut to size on top and sealed it to the frame with the silicone caulk.

This was one of my favorite pieces of the room. The final cost to create this one of a kind table was $75 and 2 days of work. I couldn't be happier with the final result and my neighbor loves having what she refers to it as "functional art" and conversation piece.


Tuesday, February 4, 2014

Post Content

So my spot as a once a month guest blogger for Habitat for Humanity's Restore has taken a turn and for the past few months I have gone from contributor to primary blogger. Which in turn has significantly affected the amount of posts on this page. :(

However, 
I am a huge supporter of Habitat for Humanity and their Restores, and I love everything that this place has done for the community as well as world wide. So I consider it an honor to be able to associated with them and help out where I can. If you are in the Mooresville/Statesville or surrounding area and you would like to take a stab at sharing your ideas and projects, please call or email Amy at 704-896-8957 or awilliamson@ourtownshabitat.org or visit
http://www.ourtownsrestore.org/volunteer/volunteer-opportunities to see other volunteering opportunities.
I have been looking forward to applying for the 2014 Designer Challenge until I actually had the application up and ready to fill out. A realization struck me that if I didn't actually make it in this year, I think I may be more devastated then not making it in last year for the first time.  So after front loading the Restore blog for the next few months worth of projects and allowing myself plenty of "pout time", I finally sucked it up and submitted my application. This year was a bit different in the fact that they wanted your 3 room choices at application versus having them after you found out you had been selected to participate.  So I had to sit down and map out exactly what I would need to pull off one of my 3 choices. Here is what I have come up with:
Solarium/sun porch
Tree fort kids room
Study
Last year, we drew numbers and that is how we got our room pick and I drew #8 (from #1-#8). Only because no one else came up with "wedding reception" is how I landed that one. So I am betting that "tree fort kids room" will be the design I will be creating if I get chosen. I will be sure to keep you all posted. :)